Measuring a Roofline From Your Desk: Satellite Plan View vs the Tape Measure
How to measure a roofline for Christmas lights from satellite imagery: a to-scale plan view, pitch corrections for rakes, and when you still need a tape.
On this page
- What an overhead view measures well (and what it misses)
- The quickest route: a satellite plan view in Light AI
- How to get a usable overhead image from Google Earth
- Scaling and tracing the plan view
- Correcting for pitch: rakes and hips
- What the overhead view cannot see at all
- When a site visit or tape measure is still required
- Checklist for measuring from your desk
- Frequently asked questions
You can measure most of a roofline for a Christmas lighting quote from your desk: get a straight-down, to-scale overhead image of the roof (in Light AI the satellite plan view loads from the address; a calibrated Google Earth screenshot also works) and trace the eaves and ridges. What an overhead view cannot show you is slope and height, so gable rakes, hips and vertical runs come out short unless you correct for pitch. Use desk measurements to quote, then verify with a tape or a site visit before you build strands.
This guide covers how to get a clean overhead image, how to scale it, which lines an overhead view gets right and which it understates, and when the tape measure still wins.
What an overhead view measures well (and what it misses)
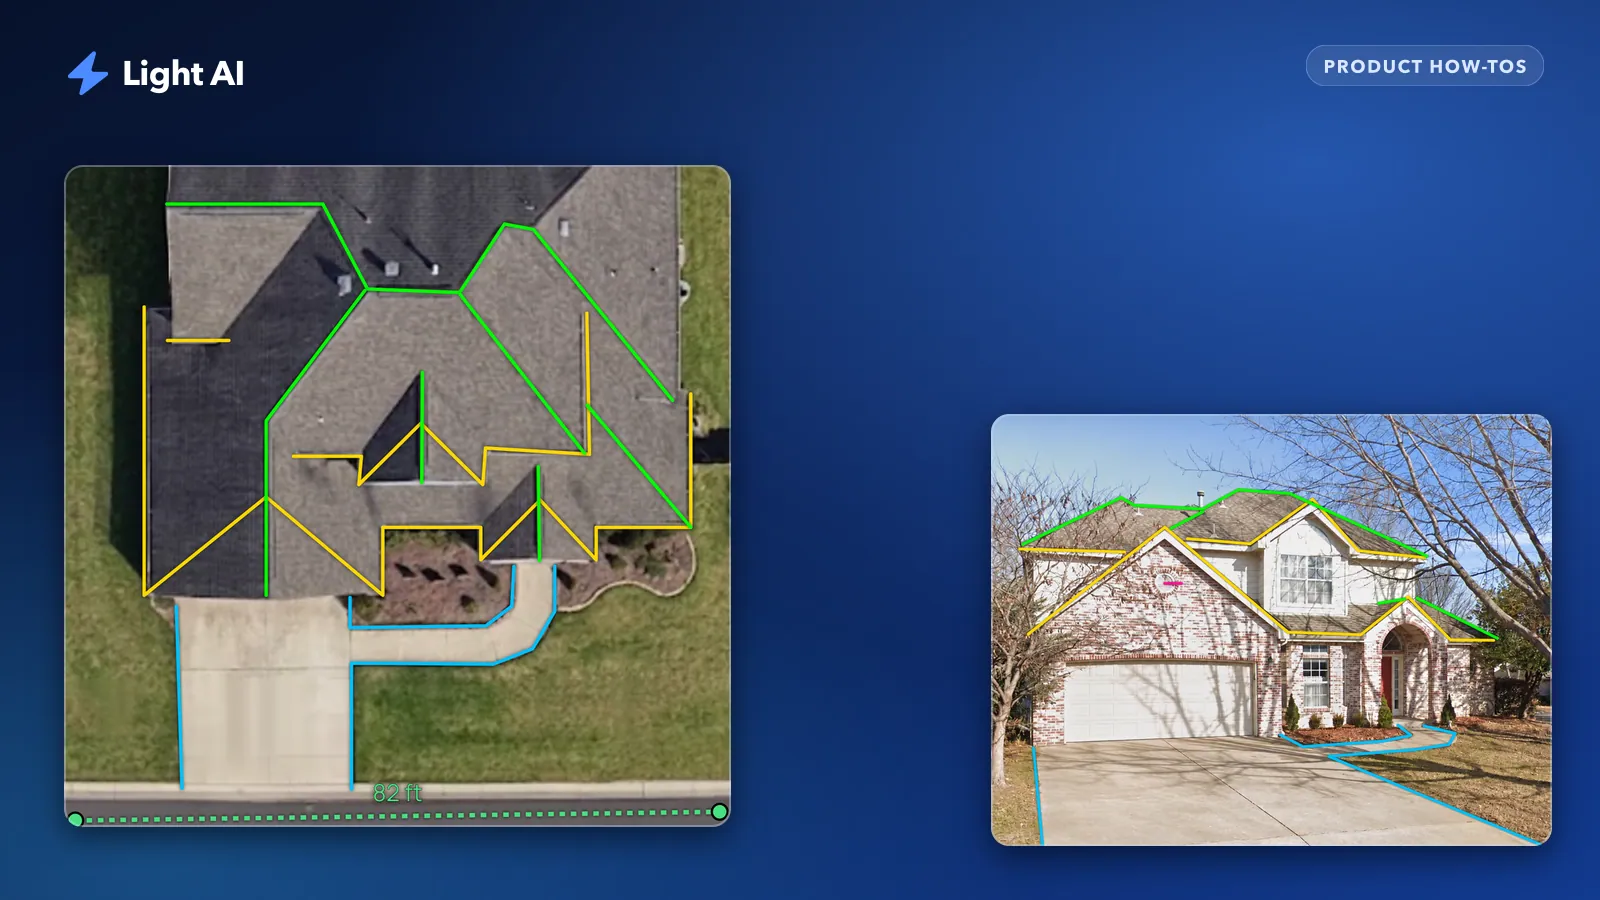
An overhead image is a map. Anything that runs level, like a gutter line or a ridge, shows up at its true length, because a level line has no vertical component to hide. Anything that climbs or drops gets squashed: the image only shows its horizontal run.
| Feature | Overhead view | Why |
|---|---|---|
| Eaves and gutter lines | Accurate | Level runs, seen at true length |
| Ridges | Accurate | Level, as long as the ridge is visible and not under trees |
| Gable rakes | Understated | Sloped; you only see the horizontal run |
| Hips and valleys | Slightly understated | Sloped diagonals, less steep than rakes |
| Vertical corners and drops to outlets | Invisible | Purely vertical, zero length from above |
| Walkways, driveways, ground runs | Accurate | Flat ground |
| Windows, columns, door frames | Not visible | Use the front photo |
That table is the whole game. Measure the level lines with confidence, correct the sloped ones, and add the vertical ones from a front photo or on site.
The quickest route: a satellite plan view in Light AI
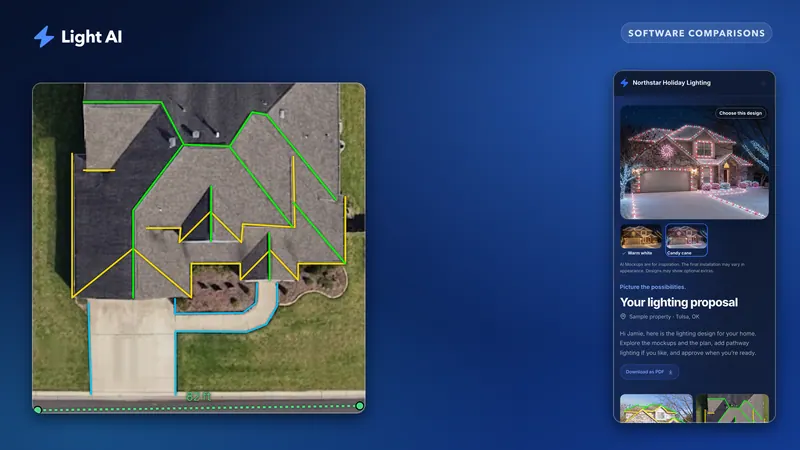
In Light AI, the plan view loads automatically from the property address. On the Intake step, the plan view card shows Plan View source: Satellite (auto): Light AI finds the house and opens a live satellite map. You drag, zoom or rotate it (North up straightens it), centre the roof in the square and click Use this view. The image you get is already to scale, so Measure skips the calibration step and you go straight to tracing. If the address is wrong, fix it and use Find the house again; if the house cannot be found or the map does not load, Intake switches to uploading your own Google Earth screenshot.
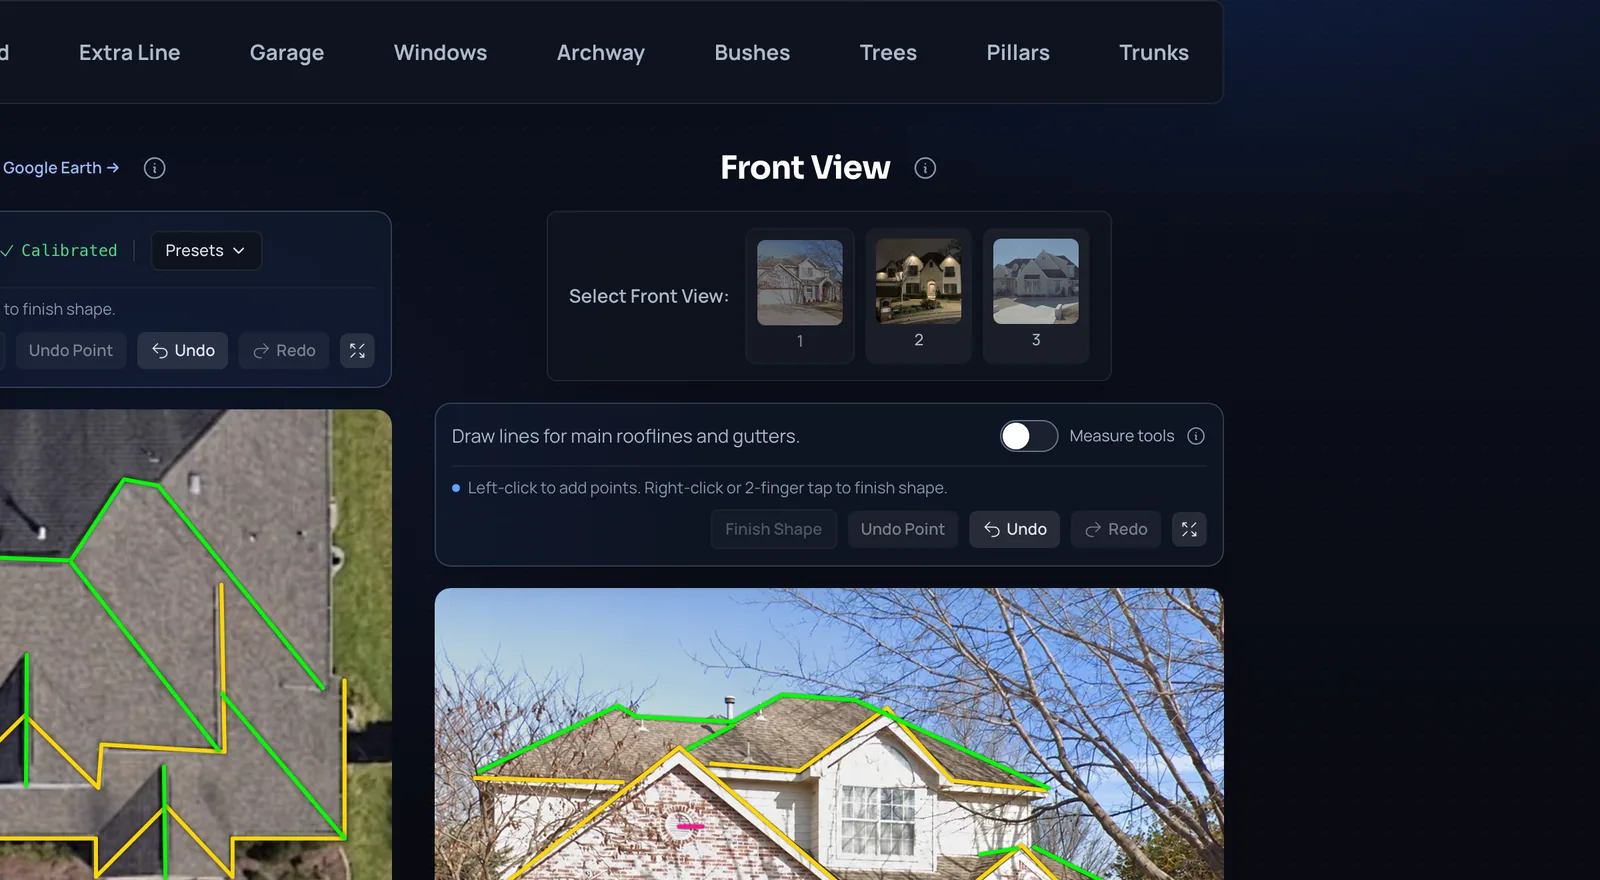
The front view works the same way: the Street View front photo loads automatically from the address. When there is no Street View for a property, upload a photo instead; the Earth, Zillow and Maps links beside the address help you find one. The adding property photos and plan view help articles cover both.
How to get a usable overhead image from Google Earth
If you prefer your own capture, or the satellite map cannot find the house, a Google Earth screenshot still works. It is only as good as the screenshot: a tilted 3D view, a fuzzy capture or a roof hidden under an oak will cost you more time than it saves.
- Find the address and look for the clearest capture. Historical imagery often has a sharper or leaf-off version of the same roof, which helps a lot with tree cover.
- Turn on gridlines and reset the view so you are looking straight down with north up. In Google Earth Pro, the U key resets tilt and R resets tilt and heading together. Any tilt stretches one side of the house and shrinks the other.
- Zoom until the whole roof fills most of the screen with a little margin. More pixels per foot means more precise clicks.
- Use the measurement (ruler) tool to measure between two grid crossings, or along a long straight edge such as the driveway or the front gutter line, and write the number down. You will click the same two points again when you calibrate.
- Take the screenshot.
Satellite and aerial images are rarely perfectly straight down. On a tall two-story house, the roof can appear shifted relative to the ground beneath it. Calibrating along a roof-level edge you have measured (rather than a curb far from the house) keeps that lean from creeping into your numbers.
Scaling and tracing the plan view
The plan view has to know how many feet each pixel represents. A Light AI satellite plan view arrives to scale. An uploaded screenshot needs calibrating in Measure: type the known distance, click Set Manual, and click the two endpoints you measured in Google Earth. Then you choose a category (Starter, Ridges, Ground and so on), click along each feature and finish the shape. The plan view help article and measuring guide walk through each click.
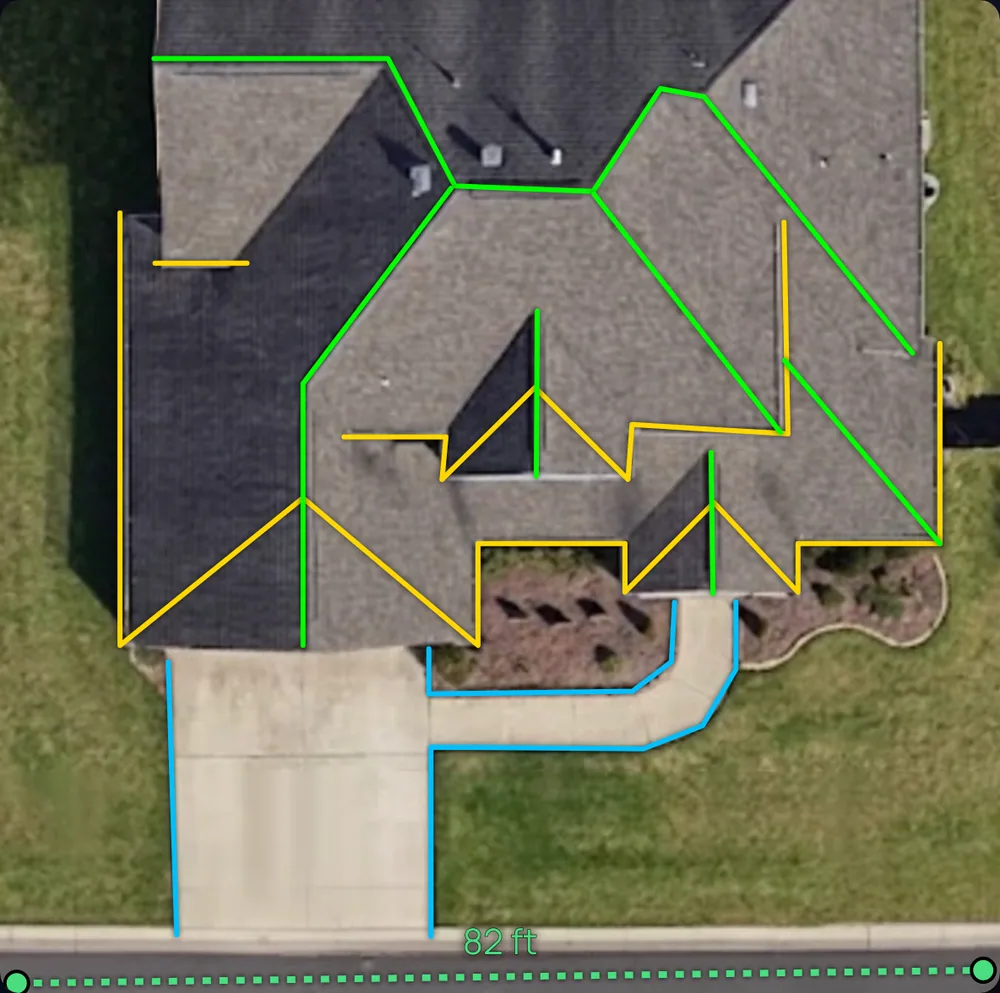
With a plan view in the project, the plan measurements are what you bill. Lines you draw on the front photo are there to show the AI where the lights go in the mockup.
Correcting for pitch: rakes and hips
Here is where desk measuring goes wrong for most people. A gable rake on a steep roof can be noticeably longer than it looks from above, and those rakes are often the most visible lines on the house.
To correct a rake, you need the roof pitch (rise in inches per 12 inches of run) and a multiplier. Multiply the overhead length by the factor for that pitch.
| Roof pitch | Rake multiplier | Hip/valley multiplier |
|---|---|---|
| 4/12 | 1.05 | 1.03 |
| 6/12 | 1.12 | 1.06 |
| 8/12 | 1.20 | 1.11 |
| 10/12 | 1.30 | 1.16 |
| 12/12 | 1.41 | 1.22 |
The rake multiplier is the square root of 1 + (rise/12) squared. The hip column assumes both roof planes share the same pitch. Example: a rake that traces at 20 feet from above on an 8/12 roof is about 20 x 1.20 = 24 feet of actual edge. Two rakes per gable, three gables, and you are suddenly short a full strand.
Estimating pitch without a ladder
- Use a straight-on front or Street View photo of the gable. Measure the gable's height from eave to peak and half its width; rise divided by half-width, times 12, gives pitch.
- Count siding courses or brick rows if you know their exposure.
- Ask the homeowner if they have roofing paperwork. Roofers record pitch.
- When in doubt, round up to the next pitch in the table. Being a little long on a quote is cheaper than being short on install day.
When to add a cushion instead
For a simple ranch with low-slope rakes, a blanket cushion is often faster than calculating each rake. Light AI's line item breakdown has a +10% cushion option for exactly this. On steep, cut-up roofs with many gables, calculate the rakes individually; a flat percentage can still leave you short.
What the overhead view cannot see at all
Some footage never shows up from above. Build these into the quote separately:
- Vertical runs: corners lit top to bottom, drops from a second-story roofline to a first-story one, and the run from the roofline down to the outlet or timer.
- Lead and extension runs: distance from power to the start of each run. This is cord and labor, not lit footage, but it is real cost.
- Front-facing details: windows, columns, door frames and garage outlines. Measure these on a calibrated front photo; garage doors and front doors make handy reference distances.
- Anything under tree canopy: if you cannot see the gutter line, you are guessing.
- Recent changes: additions, new porches or a replaced roof that postdate the imagery.
A good habit is to trace everything you can see on the plan view, then walk the front photo and list what is vertical or hidden. If the list is long, that is your sign the job needs eyes on site.
When a site visit or tape measure is still required
Desk measuring is a quoting tool. It is not survey-grade, and it does not replace verification. Plan on a site visit or a tape check when:
- The job is large or high-value enough that a 10 percent miss would hurt your margin.
- The roof is steep, multi-level or cut up with dormers and valleys you cannot read from above.
- Trees cover the eaves in every available capture.
- You need to see the gutters, shingles or fascia to choose clips and confirm the attachment method.
- Power is unclear: outlet locations, GFCI status, and whether a circuit can carry the load.
- Ladder or lift access matters to the price (tight side yards, slopes, landscaping in the way).
- You build custom-length strands or cut wire to length. Measure before you cut, every time.
For everything else, quote from the desk, set clear expectations that final footage is confirmed at install, and have your crew lead confirm measurements on day one before the first strand goes up.
Checklist for measuring from your desk
- Satellite plan view loaded from the address, roof centred, north up (or the clearest Google Earth capture found)
- For an uploaded screenshot: straight down, gridlines on, calibration measured along a long, roof-level edge
- Same two endpoints clicked when calibrating an upload
- Eaves, ridges and ground runs traced on the plan view
- Pitch estimated and rake multipliers applied (or cushion added)
- Vertical runs, drops and window/column work added from the front photo
- Power locations noted or flagged for the site check
- Quote states that footage is verified on site before install
If you want to see how measured footage turns into line items and a priced quote, read From a photo to an approved quote. For how to set the rates you multiply that footage by, see How to price Christmas light installation.
Frequently asked questions
Is satellite imagery accurate enough to measure a roof for Christmas lights?
It is accurate enough to quote level runs like gutters and ridges on a straight-down, to-scale view (a Light AI satellite plan view, or a carefully calibrated Google Earth screenshot). It understates sloped edges and cannot see vertical runs, so correct for pitch and verify footage on site before install.
How do I measure a gable rake from a satellite image?
Measure the rake's horizontal length on the overhead image, estimate the roof pitch, then multiply by the rake factor for that pitch (for example about 1.12 for a 6/12 roof). Round up when the pitch is uncertain.
Does Light AI have a built-in satellite view?
Yes. The plan view loads automatically from the address as a live satellite map; you centre the roof, click Use this view and get a to-scale image to measure on, with no calibration step. The front view loads from Street View the same way, and you can always upload your own photos instead.
How much cushion should I add to desk measurements?
A cushion around 10 percent is a common starting point for simple, low-slope roofs, and Light AI's line item breakdown has a +10% option. On steep roofs with many gables, calculate each rake with a pitch multiplier instead of relying on a flat percentage.
Can I skip the site visit entirely?
For many simple homes you can quote without one, but someone should still confirm measurements, power and attachment on install day before strands are built or cut. Complex, steep or tree-covered roofs deserve a visit before you quote.
Quote your next house with Light AI
Measure the roofline, show the homeowner a lighting mockup of their own home and send one quote link they can approve from their phone. Start on the Free plan with 100 credits each month and no card required.