From a Photo to an Approved Quote: The Light AI Workflow
A step-by-step walkthrough of Light AI: Intake, Measure, Mockup and Review, from a property photo to a published quote link the homeowner can approve.

On this page
Light AI turns a property photo into an approved Christmas lighting quote in four steps: Intake (add the photos), Measure (scale, trace the runs and set prices), Mockup (generate AI lighting concepts) and Review (write the message, choose the images and publish a quote link). The homeowner opens that link on any phone, picks options and approves, and the project moves to Approved.
This post walks through each step with screenshots, plus the habits that keep quotes accurate and fast to approve. If you are comparing tools, it is also an honest look at what a quote maker for Christmas light contractors should and should not do for you.
The four steps at a glance
| Step | What you do | What you need | What you get |
|---|---|---|---|
| Intake | Load the Street View front photo and the satellite plan view from the address (or upload your own) | The property address | Images ready to measure |
| Measure | Calibrate uploaded views, trace runs, check line items and prices | A known distance for any uploaded view | Priced line items |
| Mockup | Pick features, colors and ambiance, then generate | Credits | AI lighting concepts to choose from |
| Review | Write the message, choose images, set approval, publish | Your proposal terms | A quote link, email or PDF |
Every quote starts the same way: New Quote, pick a Christmas Lights template, a client and a property, then Create Quote. The quote builder opens on Intake. If a request came in through your website form, Start quote puts the homeowner's photo on Intake for you.
Step 1: Intake, the photos
You need one front view of the home; that is what the AI uses for mockups. You can add up to five front views if the house has more than one face worth lighting.
The overhead plan view is optional but recommended. Without it, measurements come from the front photo alone, which misses depth and roof slope. With it, plan measurements become what you bill.
Where to get photos without driving out:
- Front: the Street View front photo loads automatically from the address. If there is no Street View for the house, upload one instead: the Earth, Zillow and Maps links next to the address open the property in a new tab, and as a last resort the client can send a photo from the street.
- Plan view: the satellite plan view also loads from the address. Centre the roof on the live map, click Use this view, and you get a to-scale overhead image ready to measure. You can still upload your own Google Earth screenshot instead. Measuring a roofline from your desk covers both.
Step 2: Measure, from traced lines to priced line items
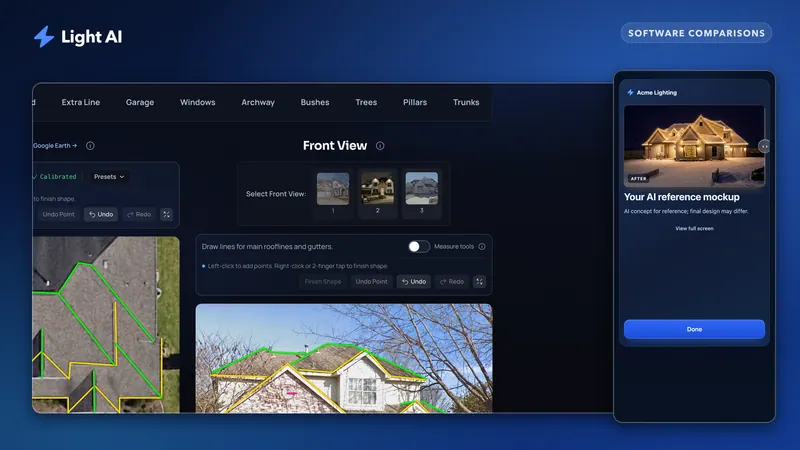
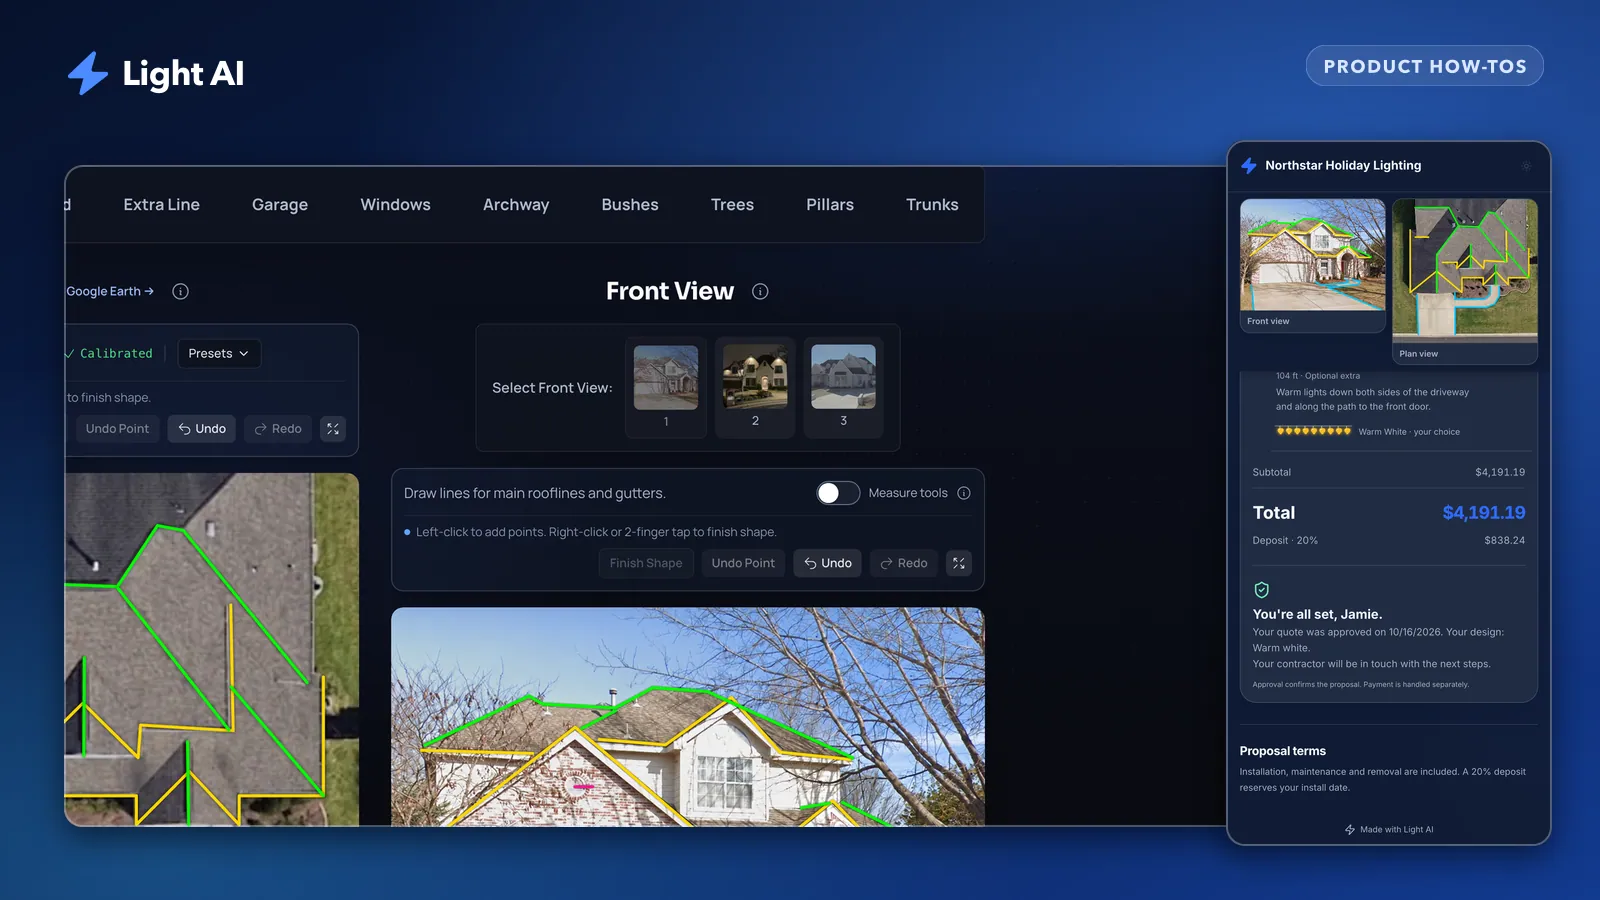
Measure is where the quote becomes real numbers. A satellite plan view is already to scale. Calibrate any view you uploaded yourself: type a known distance, click Set Manual, and click that distance's two endpoints. On a front photo, the presets (double garage, single garage, front door) are handy; Calibrate with AI can also estimate it for you.
Then pick a category (Starter, Ridges, Ground, Garage, Windows and so on), click along each feature and finish the shape.
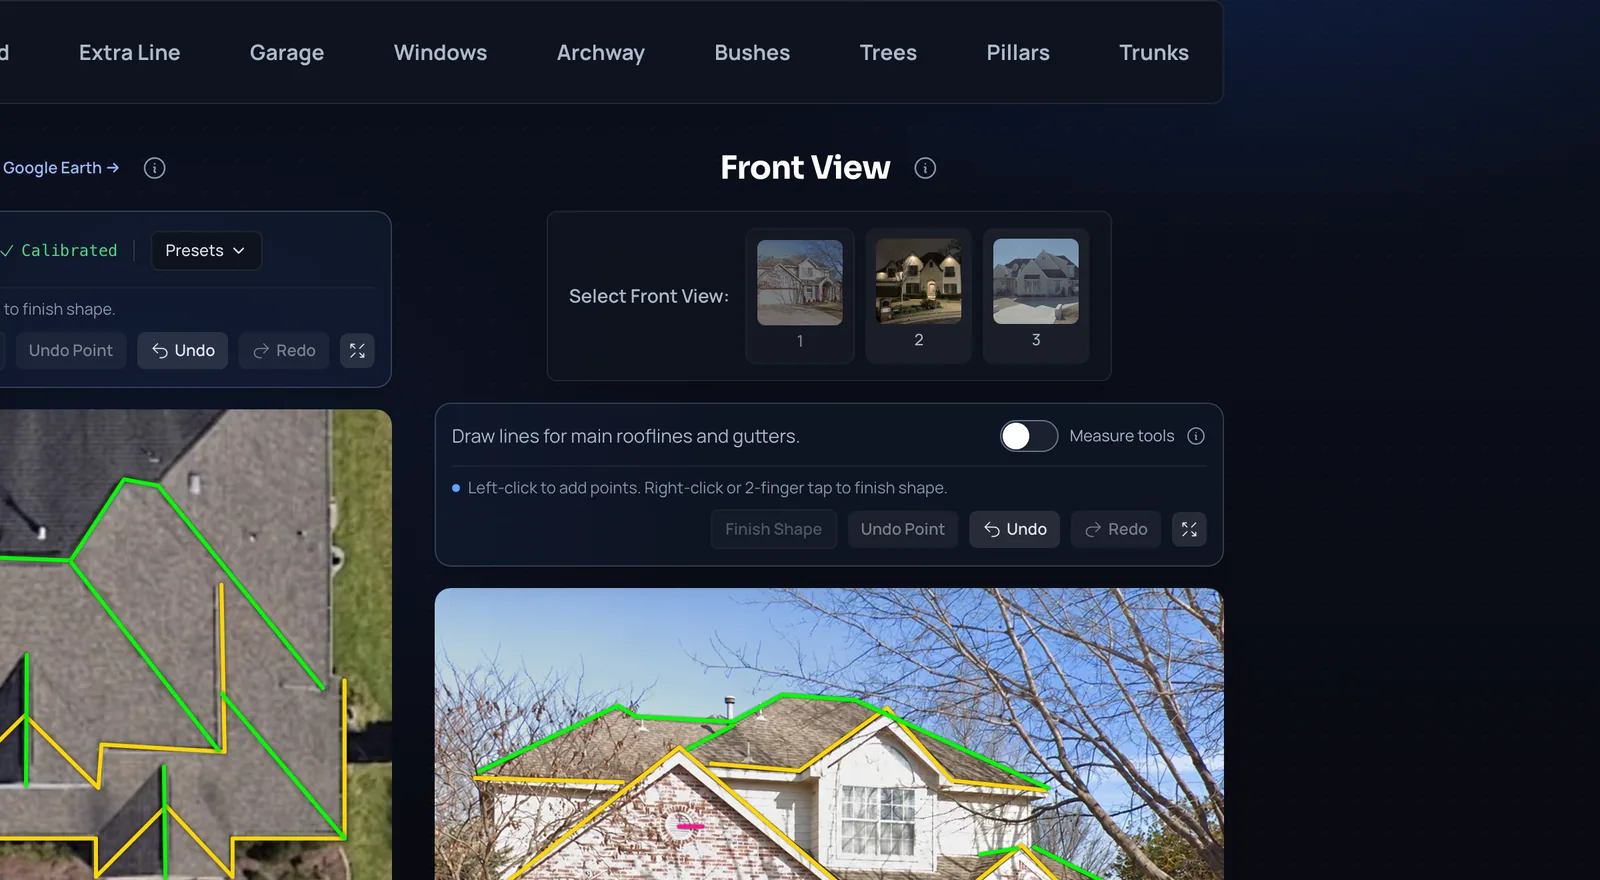
On the front photo, the lines you draw are guides that tell the AI where to put lights in the mockup. If you are in a hurry, Light AI can also generate a mockup straight from the photo without guides, but drawn guides give you more control over exactly what gets lit.
Next, check the Line Item Breakdown. You can rename items, add a +10% cushion, merge rows into one line per color, or add a custom item for work you price separately, like a wreath or a tree wrap.
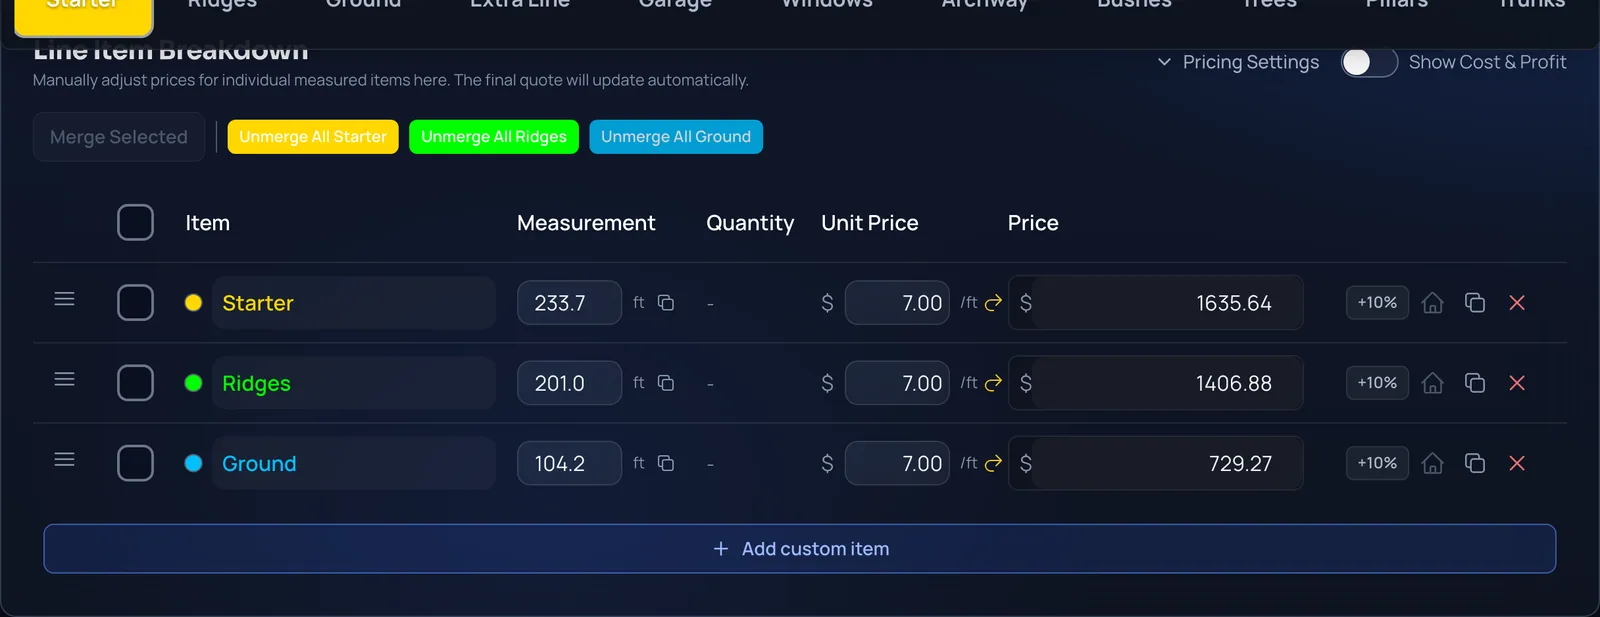
Set prices for this project in Pricing Settings, or click Save to my default template so every new quote starts from your rates. Discounts and deposits go under Quote Totals. Measurements support quoting; they are not survey-grade, so confirm footage on site before install.
Step 3: Mockup, show them their house lit
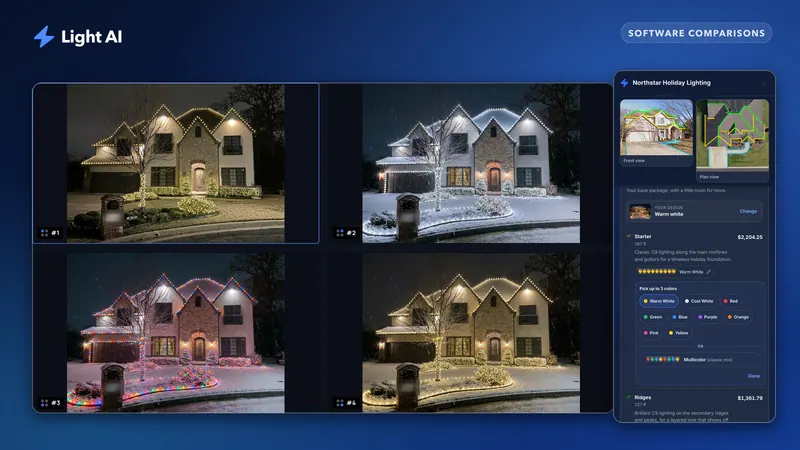
This is the step that changes the conversation with the homeowner. Instead of reading "84 ft of C9 on the roofline," they see their own house at night.
Click + Add Mockup for each design you want to try. In Features to Include, pick the drawn features to light. Then choose C9 and mini bulb colors, the C9 pattern and any ambiance, like snow or a darker sky.
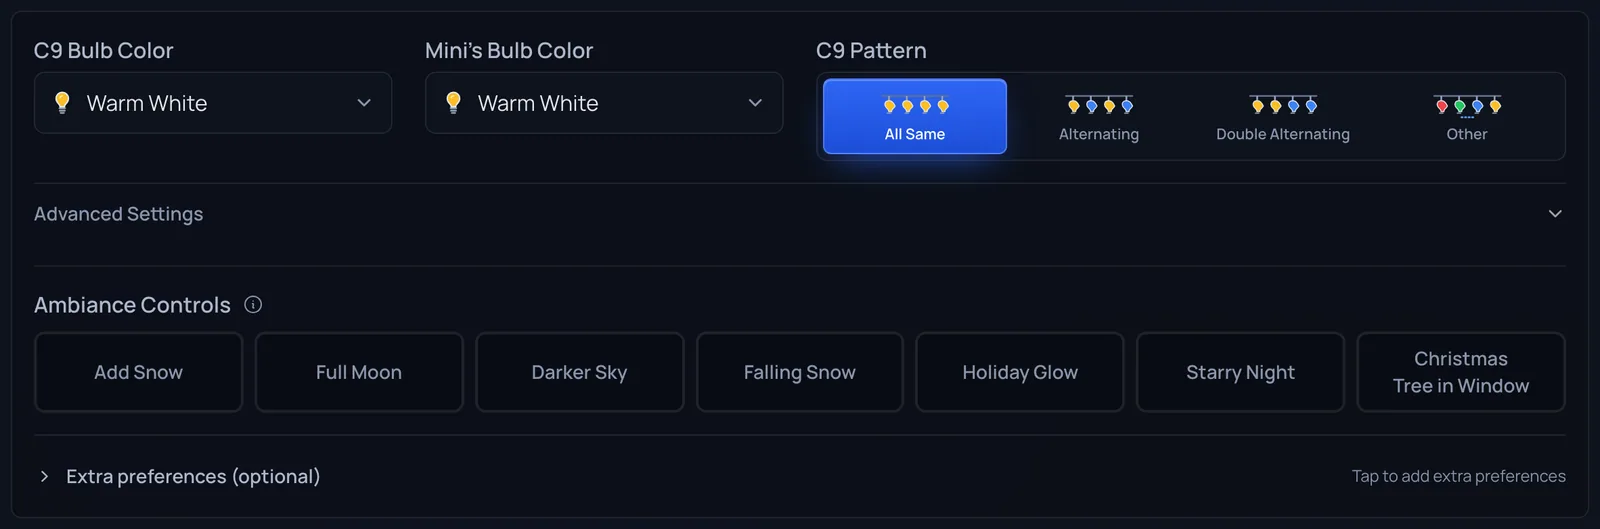
Under Advanced Settings you choose one image (5 credits) or a four-image set (20 credits); the Generate button always shows the cost before you click. You can keep working on other steps while images generate.
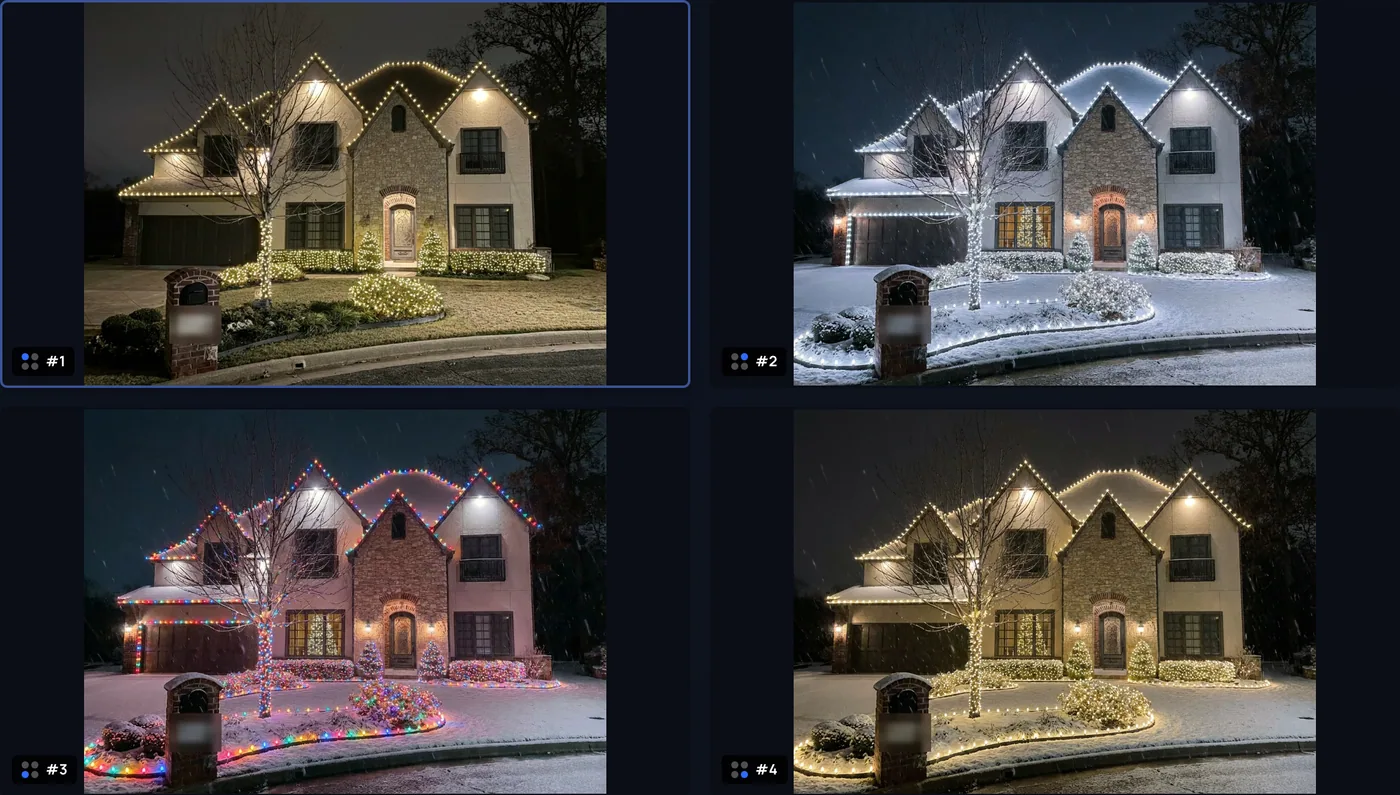
If an image is close but not right, use the blue pencil to mark areas to add or remove, or just describe the change. Each edit gives you two versions to choose from. Remember that a mockup illustrates a concept, not a guaranteed installation result. Say that to the homeowner in plain words.
Step 4: Review, the quote the homeowner sees
Review is the customer-facing quote. A good quote maker for Christmas light contractors should make this step fast without making it generic, and this is where you add the human part.
Client message. Write it yourself or click AI Write Message for a warm first draft. The AI never states prices or sizes, so type any figures yourself.
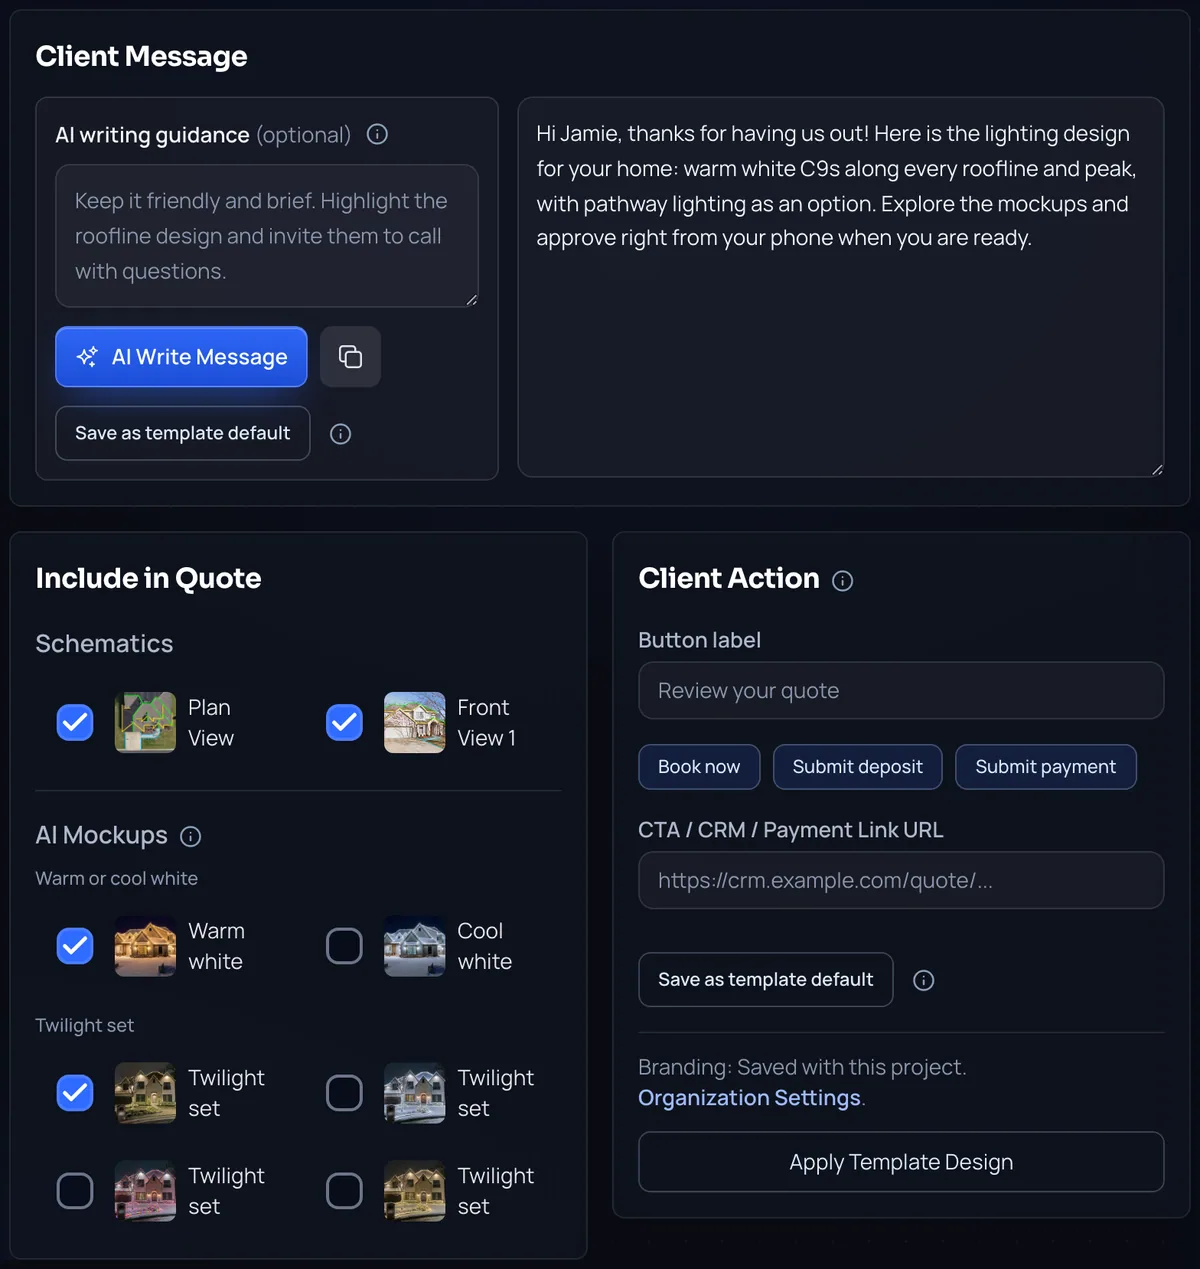
Include in quote. Choose which schematics and mockups to include. The first selected mockup becomes the cover image.
Client action. Add a button with your own link for booking or a deposit. Light AI never collects payments or deposits; the button sends the homeowner to your own payment or booking page.
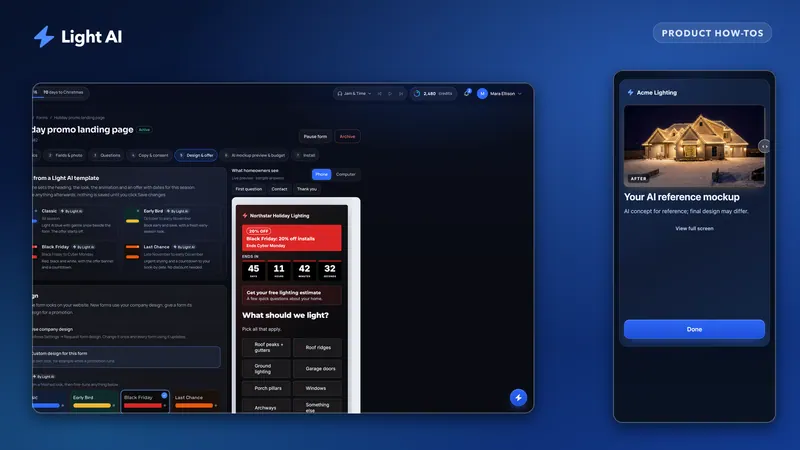
Preview. Check the quote as Mobile, Desktop and PDF. Most homeowners will open it on a phone, so the mobile preview matters most.
Publishing the link and getting the approval
Open Share as a website and choose how the customer approves: Approve in Light AI, approve with Jobber or another service, or view only. With Approve in Light AI, you can let customers choose optional extras and adjust bulb colors on their own. Edit your proposal terms, set an optional expiration date, and click Publish customer link.
Then send it. Copy the link and text it from your own phone (Light AI does not send text messages), or click Email to customer to send it from Light AI with your logo. On Pro, quote emails can come from your own verified domain.
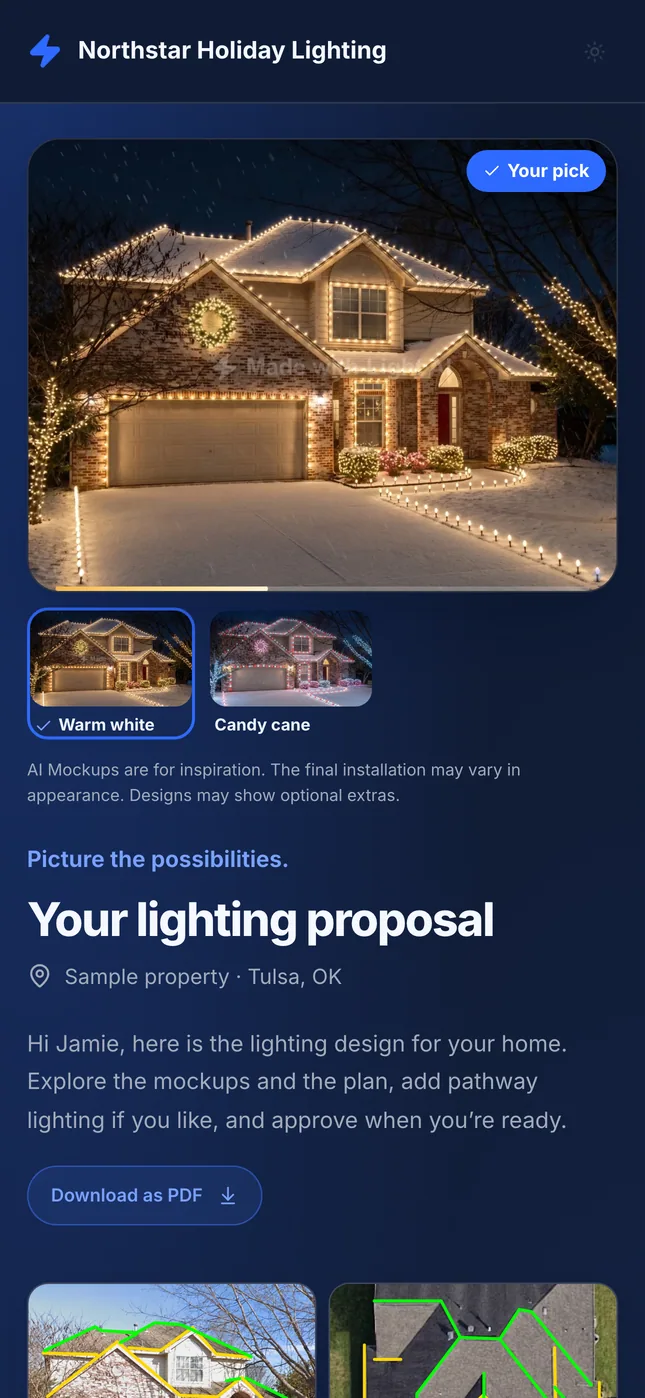
The homeowner opens it with no account needed, switches between designs, checks any optional add-ons and watches the total update, then approves with their name.
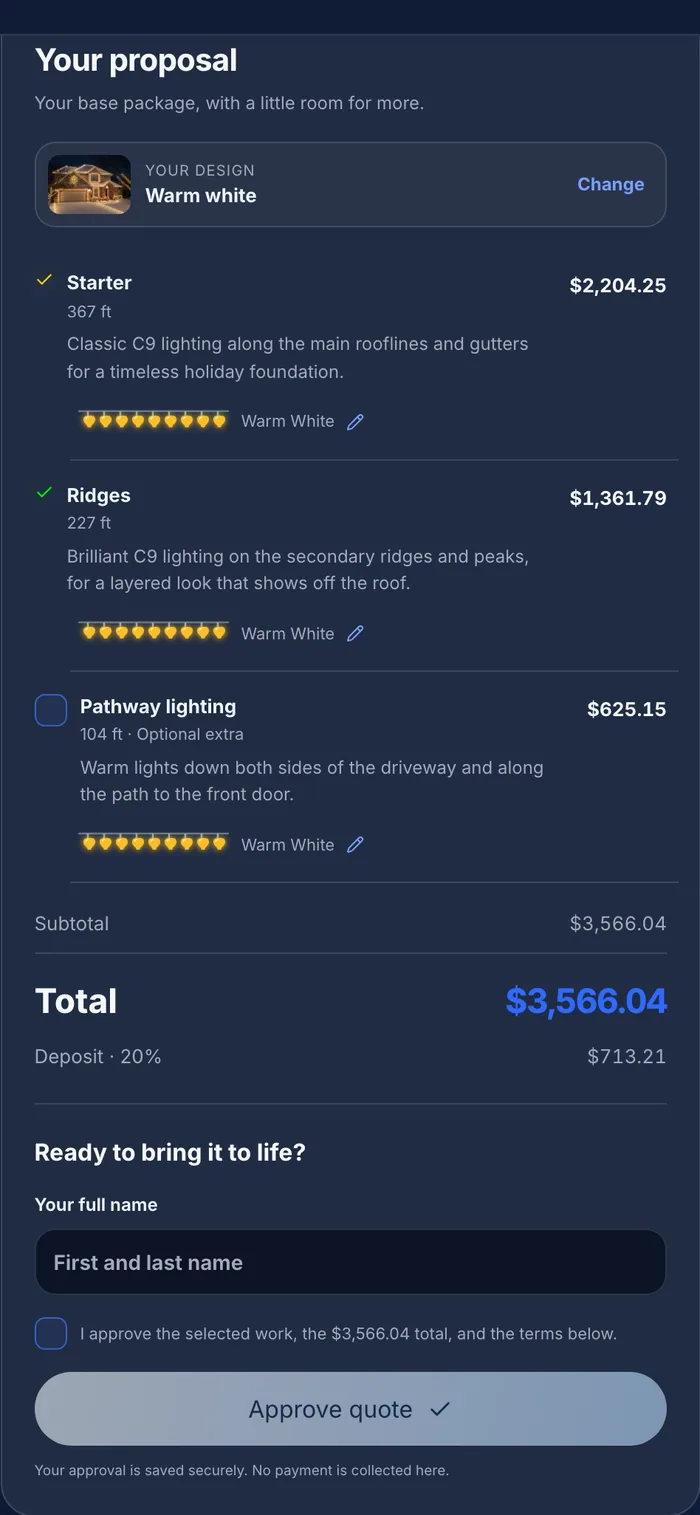
An approval in Light AI is recorded and moves the project to Approved in your Pipeline. Publishing the link already moved it to Quote Sent, so the board stays current without dragging cards.
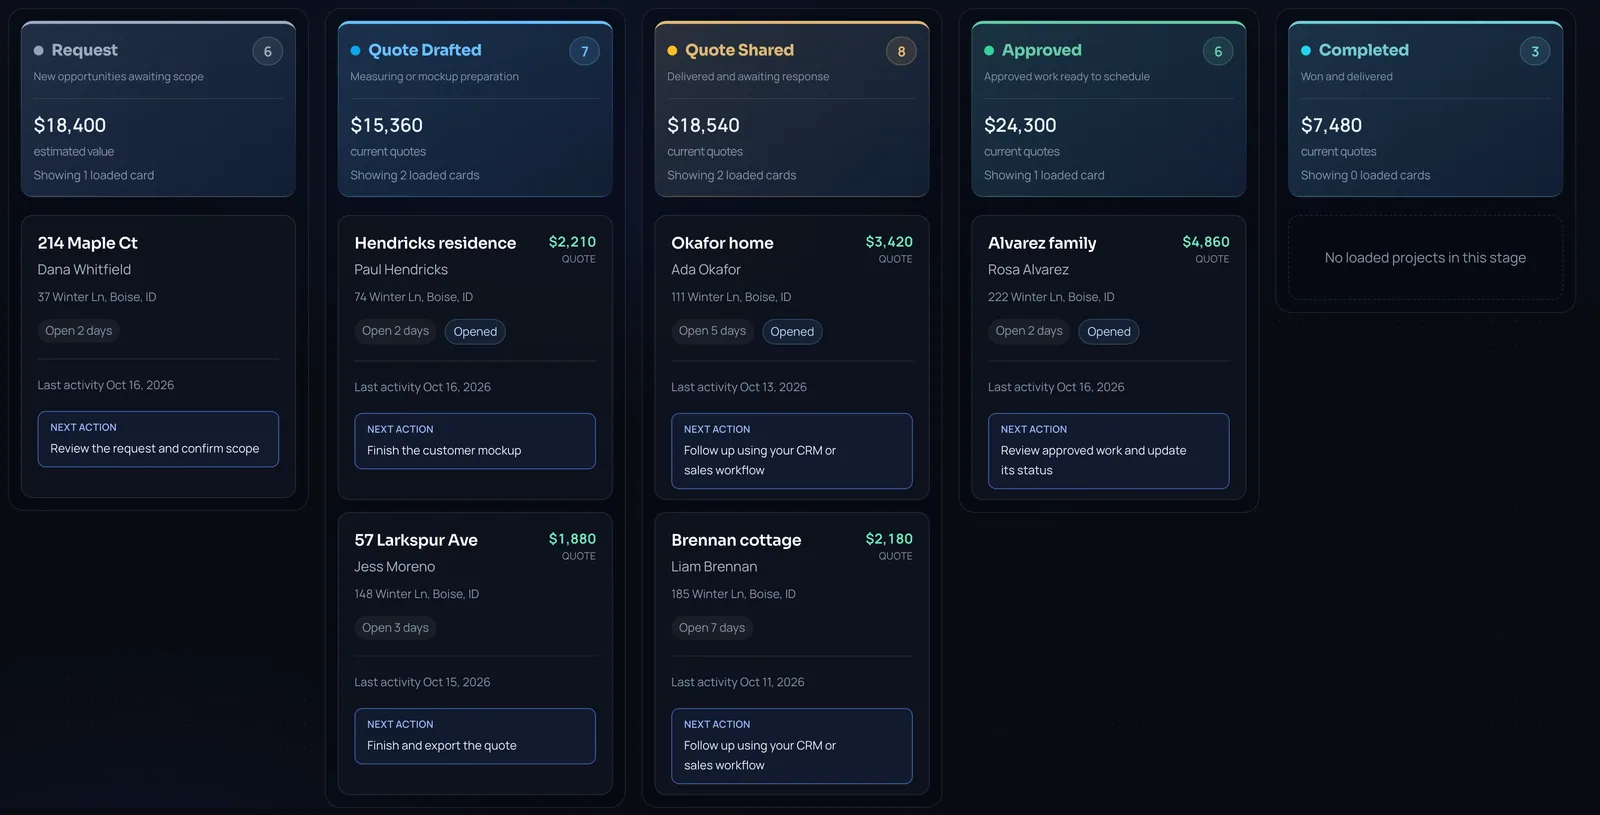
Every plan sees published quotes and approvals. Plus and Pro also show opens, viewing time and each quote's visit timeline, with optional alerts when a quote is opened, which tells you exactly when to follow up. If you change something after publishing, click Publish update; the homeowner's link stays the same.
Before-you-publish checklist
- Satellite plan view used, or every uploaded view calibrated against a real known distance
- All lit features traced, including ridges, ground runs and extras
- Rakes and vertical runs accounted for (cushion or custom item)
- Prices checked; discount and deposit set if you use them
- At least one mockup selected; the cover is the strongest one
- Client message read out loud once and figures typed by you
- Client action button points to your own booking or payment link
- Approval mode and optional extras set the way you want
- Mobile preview checked
- Link texted or emailed, with a follow-up date on your calendar
Want a PDF too? Review has Export PDF, which downloads the file and saves a copy under the project. For more on which format homeowners act on, read quote links vs PDF quotes. The first quote guide in the help center covers each step with the exact button names, and the demo shows the whole flow on a sample home.
Frequently asked questions
How long does it take to build a quote in Light AI?
It depends on the house and how many mockups you generate. Most of the time goes into tracing rooflines in Measure; once your prices are saved to a template, Review and publishing are quick.
Does the homeowner need an account to approve a quote?
No. The quote link opens on any phone or computer without an account, and with Approve in Light AI the homeowner approves by typing their name. The approval is recorded and the project moves to Approved.
Can Light AI collect a deposit when the customer approves?
No. Light AI never collects payments or deposits. You can add your own payment or booking link as the client action button so the homeowner can pay you directly after approving.
Can I send the quote by text message?
Light AI does not send text messages. Copy the published link and text it from your own phone, or use Email to customer to send it by email from Light AI.
Do I need an overhead image to make a quote?
No, a front photo is the only required image. An overhead plan view is recommended because it gives more accurate measurements, especially for roof depth and slope.
Quote your next house with Light AI
Measure the roofline, show the homeowner a lighting mockup of their own home and send one quote link they can approve from their phone. Start on the Free plan with 100 credits each month and no card required.